How To Delete the UpperFilters and LowerFilters Registry Values
There are simply ways how to delete the UpperFilters and LowerFilters Registry Values. For Windows Operating System (OS) users, these steps will not take more than fifteen minutes.
All you need is patience and focus in doing this task. The first step on how to delete the UpperFilters and LowerFilters Registry Values is to go to the Start button located at the lower left on your screen. Click it.
For Windows XP users, you can choose to click Run. At the Run textbox, type regedit and click OK or ENTER. For the Windows 7 and XP users, you can type the same at the searchbox.
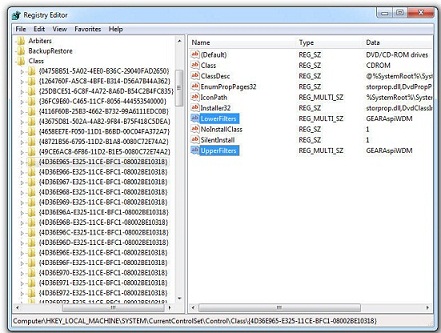
This is the first phase on how to delete the Upper Filters and Lower Filters Registry Values. Meanwhile, after encoding regedit, the Registry Editor will appear.

This is the second phase on how to delete the Upper Filters and Lower Filters Registry Values. In the Registry Editor, go to My Computer for the HKEY_LOCAL_MACHINE.
Expand the folder by clicking the |> or (+) icon beside the folder name. Do this until you will see the registry key HKEY_LOCAL_MACHINES\SYSTEM\CurrentControlSet\Contro\Class.
To proceed on the process of how to delete the Upper Filters and Lower Filters Registry Values, click the |> or (+) icon beside the Class key.
By doing this, some subkeys will appear. In here, choose the Class GUID of the hardware that has the code error in the Device Manager. Click the corresponding subkey. After which, determine the UpperFilters and LowerFilters.
Choose Delete after right-clicking the UpperFilters. Do the same with the LowerFilters. Close the Registry Editor window and reboot your computer. After rebooting, check whether the desired task was accomplished.
These steps on how to delete the Upper Filters and Lower Filters Registry Values are just basic guide for you. If you really do not know how to go through the process, it is recommended that you hire a technician or computer programmer to do the task.
See Also...
- Guidelines For Dealing With Pc Application Errors
- 12 Cache Problems
- Best Methods to Combat DLL Issues on Your PC
- Common Dll Issues and Solutions
- Emergency BackUp Files
- Fix computer errors
- Fix Computer Software
- Registry Cleaner Review
- How to Open Registry Editor
- Msvbvm50 dll Not Found Errors
- How to Perform Raid Data Recovery PC
- List of Run Commands in Windows 7


